
 Download
Description and Purpose
The Match lesson type provides a way for students to demonstrate understanding of concepts by matching picture, symbol, or word cards to text. This application supports self-correction.
How it Works: Play Mode
To open up a lesson, select the Lessons icon from the Tools section of the main Snowflake MultiTeach menu. This will lead you to the Lessons Home Screen, where you can search for and select lessons. Press the “Play” icon located on the middle of the lesson to open it.


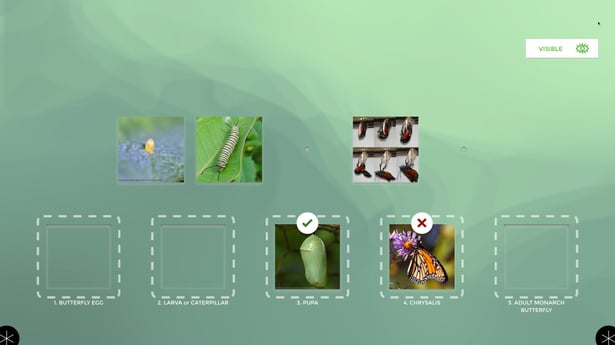
After opening up the lesson, a row of cards are displayed in the center of the screen. In this example, students drag image cards to the correct placeholders located near the bottom of the screen. More than one student can interact with the content at the same time. The button located in the top right corner of the screen can be toggled so students can see if their responses are correctly placed. Each card can display images, text, text + images, and can also include audio. Cards with audio are activated when the card is placed in the correct location.
Menu Items

In Play mode, menu items can be accessed by selecting the corner menu icon.
Tapping the Zones icon enables the screen to be divided into sections to run other apps or lessons simultaneously. The Annotate feature can be activated so the teacher or students can write on the screen’s content.
To minimize the screen, tap the Minimize icon. Tapping on the Snowflake MultiTeach application icon will resume the lesson.
If using a display in table mode, the Rotate icon can be used to orient the section in the proper direction. The Mute icon can be used to toggle the sound off and on, if sound is available. The Help menu will call up help information.
The Back icon will lead to the lesson’s preview screen, where a modifications con be made to a lesson. The lesson can be exported to the hard drive, or exported directly to the MultiTeach® Lessons Community, by accessing the buttons located in the lower right section.
The Convert icon will lead to the Lesson Type selection screen, where another lesson type can be selected for on-the-fly conversion. More information about lesson conversions can be found in the support documentation.
The Restart icon restarts the lesson. The Hide/Reveal icon will return the items to the correct locations, making it easy for students to check the answers.
To stop the lesson, tap the Close App icon.
TIP:
Before starting, make sure that you have registered for the MultiTeach Lessons Community. Directions for registration can be found on the site.
To access a previously created lesson, launch the Lessons app, found in the Tools section of the main Snowflake MultiTeach menu. In the Lessons Home Screen, a list of previously loaded lessons will appear in the list of lessons located in the middle of the screen.
If a lesson type you are seeking is not listed, you can select the Community Lessons Icon to search for lessons directly from the Lessons Home Screen. Use the drop-down boxes to search by age group, lesson type, subject, and country. The lessons that meet your selection choices will appear in the list column.
Select the green download button located in the center of the lesson’s thumbnail to import the lesson to the Lessons Home Screen.If there is no thumbnail image, press “play”. When you close the lesson, the thumbnail will appear.
For more information about the features of the Lessons Home Screen, view the Lessons Homescreen Tutorial.
How to Build
To create a new lesson, launch the Lessons app, found in the Tools section of the main Snowflake MultiTeach menu. This will lead you to the Lessons Home Screen. Select the Create New Lesson button, which will lead you to the lesson type selection screen, where you will select the lesson type.

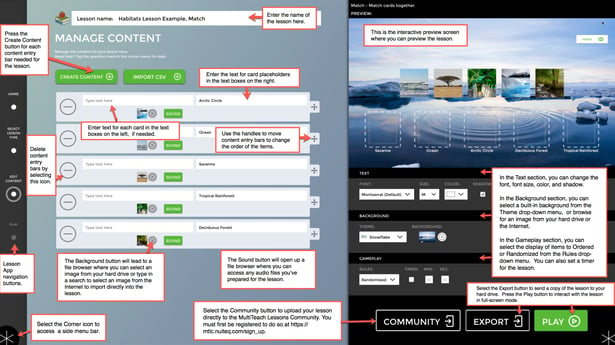
Manage Content
The Manage Content screen opens upon selecting the lesson type, where content for the lesson can be set. Below is an example from a previously created lesson.
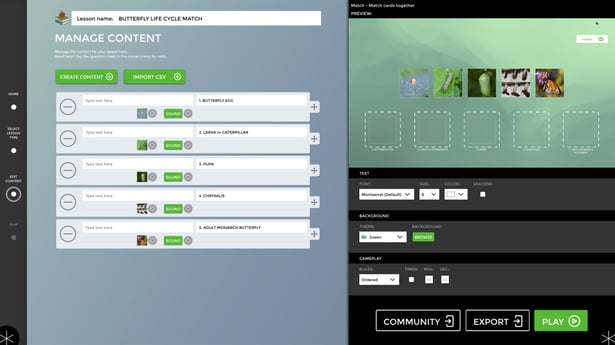
Type in the title of the lesson in the textbox located at the top left-hand side of the screen.
Tap the Create Content button to add each content bar needed for the lesson. Within each content bar, Items can be set to display as text-only, image only, or text + image, and include audio, for this lesson type.

Enter the text for each item in the text boxes. Any text entered in the left-side box will appear on the card. Text typed into the right-side box will appear beneath the card placeholders, as shown in the above screenshot. The handles located on the right side of each text/content bar let you move them into the order you choose.
Use the Background button located beneath the left text box to import images, and the Sound button to import audio, if needed. Selecting these buttons will activate a file browser.
From this browser, you can select images from your computer, or enter a search term and select images from the Internet. Items can display as text-only, image only, or text + image. The Sound button calls up a similar browser, but without the internet search option. If an object has sound added, it will play when the card is placed to the correct location.
Preview Screen
The Preview Screen, located in the top right of the interface will display items as you work. After you complete making the lesson, the Preview screen provides a way to play the lesson and check if any changes are needed.
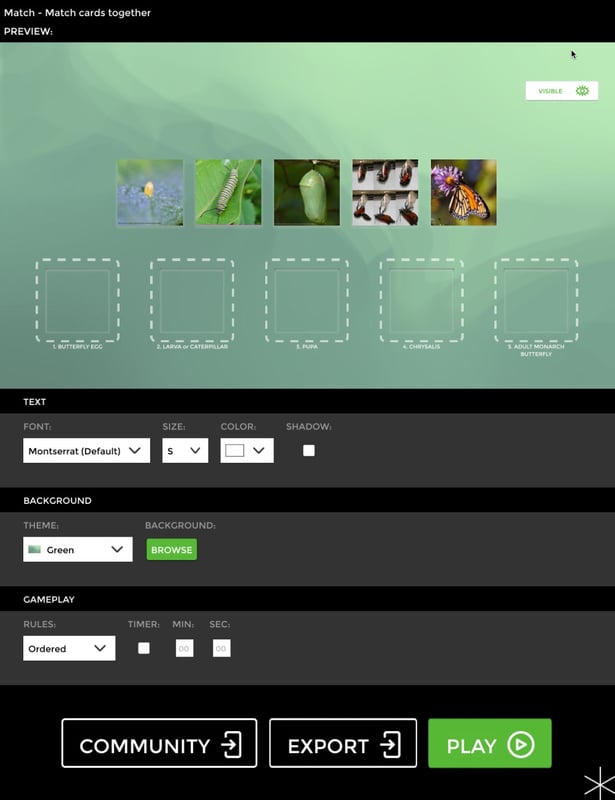
The button located in the top right hand corner of the screen, if toggled, it will display which cards are correctly placed, via small indicator on the card. This feature is the default setting and will appear in the lesson in Play mode.
In the Text section, located beneath the Preview Screen, you can select the font, font size, font color, and font shadow.
In the Background section, under Theme, you can choose a Snowflake MultiTeach theme from a drop-down menu for the background of the lesson, or under Background you can use the green Browse button to open a file browser, and then select an image from your hard drive or from the internet.
In the Gameplay section, you can activate and set a timer.
The Community button lets you upload your lesson directly to the MultiTeach Lessons Community. Select the Export button to save the lesson to your hard drive or other storage location. To interact with the lesson in full-screen mode, press Play.
Annotated screenshot
Want to use the Match lesson type for your instruction? Download now the FREE 14 days Snowflake Multiteach trial by clicking the button below:


